Here's a look at what went into the shop. It got pretty elaborate since
I wanted a toilet and heating. Plus we wanted to have a garage so we could
have both vehicles off the street.
Adding the toilet meant we had to buy 10
toilets for the cities' low-flow toilet
renovation
project,
so
saving me steps to come back into the house to use the toilet
was
non-trivial.
Hey! I'm old... what can I say?!
And the heating system ended up being a radiant
(hydronic, buried in the floor) heating system. It's almost silent and operates
flawlessly.
Here's the photo diary of this new construction...
-01.jpg) |
Here's the main part of the crew: Daniel is on the far left,
he runs this construction crew and is a fabulous builder; Pepito in the
brown
watch cap, a great carpenter plus a hundred other building skills;
Tony, Daniel's step son and all around nice guy and great with tile (I
understand Tony is driving a truck these days).
They're clearing the trees that are in the way of the shop & garage
in preparation for digging the foundation.
|
-01.jpg) |
A detail of the foundation trench. |
-03.jpg) |
The same, this time including the re-bar. Btw, wile traveling to New
Zealand Celia & I met the granddaughter of the man who invented re-bar
(reinforcing bar). |
-07.jpg) |
And here's where the foundation trench ends at the alley way. Actually
it's a one way street (W Houghton) that is all of 10' wide. |
-09.jpg) |
Another shot from the side closest to the back patio. |
 |
One of those sunny days. By this point the foundation wall is in on top
of the footing.
There was a delay of several weeks because they had run out of cement.
Turns out that the businesses which manufactured the cement (the most
important ingredient in concrete) have been sold to foreign enterprises.
Now the priority for shipment is to the parent company. The new owners
are in Mexico and China. Nice, huh? We seem to be selling off our resources! |
 |
More of the same, this time looking back toward the house from the garage
and showing most of the shop. |
 |
A few days after Thanksgiving and we had some more snow. The insulation
is destined for the foundation to minimize heat loss (a New Mexican code
requirement). |
 |
Here's the insulation in place as well as the metal reinforcement in
the floor and the tubing for the radiant heating. There's insulation under
the reinforcement and tubing to minimize heat loss to the ground. |
 |
More of the same. |
 |
It's early December now and the concrete has been poured and the framing
is going up. When a wall goes up, everybody helps! |
 |
That's a 6"x12" beam that runs from the shop to the outer corner of the
garage. |
 |
Sheathing in place as are the canales. The garage still has only one
of the two beams which will support the roof. |
 |
Bith garage beams are in place, the intermediate supports have been
set, the sheathing is on and the rafters are in place. The amount of debri
is amazing. It got cleared out every Friday and seemed to regrow itself
on Monday. |
 |
Here's the original garage floor. It was so close to the street that
the slope was prohibitive. Daniel had to cut 7' off the end and then pour
a driveway that had a more manageable slope. |
 |
It's now Mid-December. From the garage toward the shop. One of the Pozzi
(Jeld-Wen) Fench doors. At this point the shop/garage is near ready for
plaster, but
the
kitchen
is getting the attention so nearly everything but the electrical has stopped. |
 |
It's starting to take shape to the point you see what's intended for
the interior. This is looking toward the house where the mechanical room
(left) and bathroom are located. |
 |
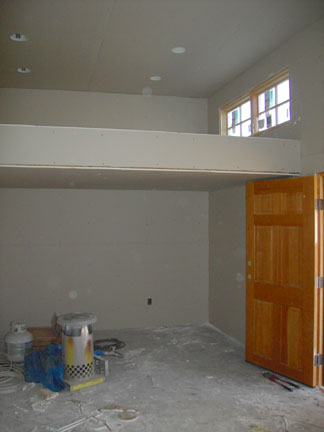
And the opposite end.
It was at this point that I realized that, even though I'd talked about
wanting a storage loft, I'd never asked that it be done. These are 12' high
ceilengs and it would be a waste to not take advantage of the space. |
 |
Standing in front of the bathroom looking toward the garage. |
 |
Here's where the water came thru the floor from the house. |
 |
And the sewer connection for the toilet. We had a choice of either having
a collection tank then pumping uphill to the sewer connection from the
house, or petitioning for a 2nd sewer connection. This involved having
the city write qaq report. Translated, this means give them $500 and they'll
let you have another connection. |
 |
It's 2 days before New Years Day and the wiring is coming along. |
 |
Here are the rafters for the storage loft. |
 |
The garage seemed to hang at this point for months! |
 |
It's 5 February and the brown coat (which is grey!) and plaster are
going on.
We kept trimming that blue spruce to gain clearance for the workers
but
at
this
point we
finally had to remove it. It's a shame... the tree was thriving. |
 |
The garage ready for it's coating of makeup. We saved the aspen beside
the garage, but they got so dry that they suffered badly. It threw up new
runners, but they just don't weem to be very robust. |
 |
Here's the garage with the sheet rock in place. |
 |
The inside of the shop looking at the bathroom. The mechanical room (where
the boiler for the radiant heat is) is on the left. |
 |
The French doors look really cool with their fresk coat of varnish stain. |
 |
We finally have a door between the garage and the shop though the locksets
aren't yet in place. When they sheet rocked, they even did the floor of
the loft. That had to be ripped out. |
 |
You can see one of the seven 120 volt outlets here. Unfortunately all
7 were tied to a single breaker. Almost 2 years later I finally had an
additional breaker installed and the 7 outlets split to 4 & 3. |
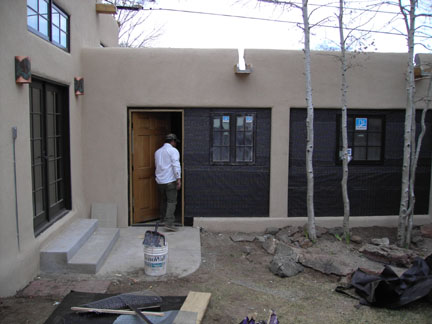 |
Now it's the end of March. Daniel stepping into the garage. The empty
spaces between the supports have been filled and a couple windows installed.
I foolishly decided I didn't want insulation in the walls since it was
going to be used for a garage only. Bad decision. We learned that the winter
snow forms a layer of ice that makes it impossible to make the tight turn
and go up the steep ramp into the garage. So the garage is now part of
my shop space and needs insulation. A year and a half later all that great
looking wall board has been ripped down and insulation installed. I took
advantage of the situation to install plywood instead of wallboard. Now
I can hang things anywhere! |
 |
I happy Daniel... he's getting close to finished! |
 |
Another shot of the (nearly finished) garage. |
Here are a few more pics of my tools in place in the shop and the garage and
the changes made to the garage to make it more useable.
 |
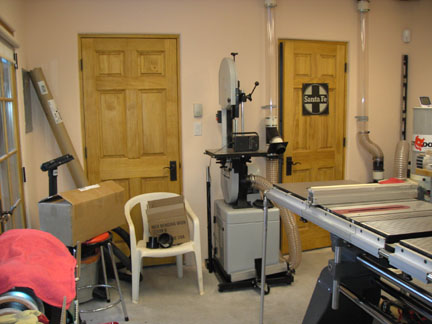
November 2006: looking toward the loft. You can see the balst gates for
the dust collection system (l), the work bench (l) and the Shopsmith (r).
In the back are the storage racks for guitar material & tools as well
as moveable shelving for Shopsmith accessories. The Makita 12" sliding
compound miter saw is on the left. |
 |
More of the storage area with the Fini compressor in front. There's even
a Panasonic microwave just out of view. |
 |
Stacked on the WorkMate is the side bending machine I got from Jim Hall
of Blues Creek Guitar. |
 |
Better detail of the Shopsmith accessories. These are just the big ones
that need more space. There is also 2 shelves of accessories for lathe
turning, shaping, sanding, sharpening, etc. These are some of the guitar
molds I bought from Jim Hall in Pennsylvania (Blues Creek Guitar). |
 |
The black blob in the corner is a 12" Shopsmith thickness planer, a 16/32
PowerMax thickness sander and the 6" Delta X5 jointer. |
 |
This is the 12" Makita sliding compound miter saw on the PowerMate stand
I bought. I had intended this be a temporary home till I could build a
stand, but it really works well and looks like it will stay. |
 |
Dust collection system leading to the Jet dust collector in the corner.
That's a Delta 14" bandsaw (1 hp) with a riser block installed. The Shopsmith
is in the middle. |
 |
A better shot of the band saw. What a work horse... I love this thing! |
 |
All the luxuries of home: a bathroom. What can I say? I'm old and the
bladder doesn't hold much! |
 |
The lavatory. The lavatory base unit is the same cherry cabinetry used
in the remodel of the kitchen, hallway and front bathroom. |
 |
The roll around is home for the Tormek sharpening system and the granite
machinist flat/ |
 |
Some of the wood I have stored. |
 |
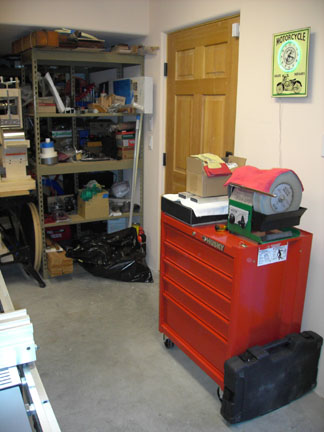
December 31 2006. I've added shelving to store pearl and wood plus a
few specialty guitar tools. |
 |
If you're an X-Files fan, you'll recognize the poster! |
 |
New Years Eve 2006... warm & comfy in the well insulated shop! |
It took almost 2 years, but I realized there were some changes needed. And
they were all things I should have anticipated from the beginning. Aaarrrgh!